IOS使用CAReplicatorLayer重建动态的倒影
Mar 31, 2012
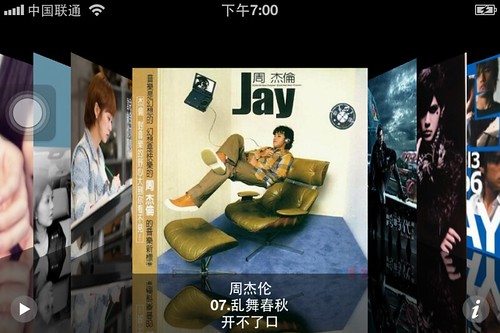
最近在看ios中关于core animation的一些东西,其中就有一个是任何创建倒影。 创建倒影应该是蛮常见的吧,比如你打开iphone中的音乐,这个时候如果你将你的手机横过来,就可以看到这个cover flow的效果了。仔细看的话,你会发现这个每张专辑图片下都有一个倒影。是的,这便是这篇文章的主题。我们会先讲一个普通且常见的创建倒影的方式,然后讲一讲它的缺点,最后讲讲新重建倒影的方式。
 常见创建倒影的方式:
 这一段描述还是过于抽象,这样从上面的例子来说吧。我们先设置bounds,那就是contentLayer的长和高。 然后设置它的position,它是在水平的中间和竖直方向的顶部。假图片的长高是200. 那么这里如果不设置anchorPoint的值,那么它默认是(0.5,0,5) ,那么你会看到图片前(200 - 100 - 10 = 90) 90像素超出了整个屏幕。因为它(0.5,0.5)定义了postion将是在bounds横轴宽的中间位置和数轴的中间位置。 如果我们想让图片在10像素时才开始显示,其实也是想让数轴上的position刚刚也是bounds的origin y轴起点,由于y轴往下是正,所以我们就是将anchorpoint设置为(0.5,0) .
那你再看如果设置mask层时,可能就相对容易了。我们先设置它的长高,长度是一样的,但是高度就只有一半了。然后接下来需要注意了:
mask.position = CGPointMake(mask.bounds.size.width/2, mask.bounds.size.height);
你需要注意到position并不是CGPointMake(mask.bounds.size.width/2, 0), 因为我们需要做倒影,所以在
reflection.transform = CATransform3DMakeRotation(M_PI, 1, 0, 0);
调用了CATrasnform3D来对空间做出调整。这里我们绕着x轴,顺时针旋转了180度,所以整个reflection层都倒过来了。但是它是按照哪个点进行旋转了,虽然我们知道它是按照x轴旋转的? 所以这里的anchorpoint就是重要的,它作为任何改变层的geometry的轴心点。我们知道如果我们不指定anchorpoint,它默认是(0.5,0,5)就是在层的正中间。 所以图片才会正确的翻过来。但是因为这种transform赋值是会应用到所有的sublayer 包括自己的。 所以此时reflection包括所以它的子层的坐标系发了改变,y轴已经倒了过来,现在是指向了上面。试想一下,x轴不懂,顺时针转180度,此时是不是y轴就刚好倒了它的反面。所这正是mask的position.y 是mask.bounds.size.height而非0的原因。
这一段描述还是过于抽象,这样从上面的例子来说吧。我们先设置bounds,那就是contentLayer的长和高。 然后设置它的position,它是在水平的中间和竖直方向的顶部。假图片的长高是200. 那么这里如果不设置anchorPoint的值,那么它默认是(0.5,0,5) ,那么你会看到图片前(200 - 100 - 10 = 90) 90像素超出了整个屏幕。因为它(0.5,0.5)定义了postion将是在bounds横轴宽的中间位置和数轴的中间位置。 如果我们想让图片在10像素时才开始显示,其实也是想让数轴上的position刚刚也是bounds的origin y轴起点,由于y轴往下是正,所以我们就是将anchorpoint设置为(0.5,0) .
那你再看如果设置mask层时,可能就相对容易了。我们先设置它的长高,长度是一样的,但是高度就只有一半了。然后接下来需要注意了:
mask.position = CGPointMake(mask.bounds.size.width/2, mask.bounds.size.height);
你需要注意到position并不是CGPointMake(mask.bounds.size.width/2, 0), 因为我们需要做倒影,所以在
reflection.transform = CATransform3DMakeRotation(M_PI, 1, 0, 0);
调用了CATrasnform3D来对空间做出调整。这里我们绕着x轴,顺时针旋转了180度,所以整个reflection层都倒过来了。但是它是按照哪个点进行旋转了,虽然我们知道它是按照x轴旋转的? 所以这里的anchorpoint就是重要的,它作为任何改变层的geometry的轴心点。我们知道如果我们不指定anchorpoint,它默认是(0.5,0,5)就是在层的正中间。 所以图片才会正确的翻过来。但是因为这种transform赋值是会应用到所有的sublayer 包括自己的。 所以此时reflection包括所以它的子层的坐标系发了改变,y轴已经倒了过来,现在是指向了上面。试想一下,x轴不懂,顺时针转180度,此时是不是y轴就刚好倒了它的反面。所这正是mask的position.y 是mask.bounds.size.height而非0的原因。
 所以这个代码还行,但是它有些缺点,其中最重要的是它是静态的。
假设我们此时我们现在在contentLayer上了加了一个文字层, 我现在想我点击这个文字增加一个animation动画,在contentlayer上上下活动,然后我想这个倒影层始终保持更新同步(文字也在倒影层中移动)? 这个该怎么做了?
所以这是当前做法的局限性,本质上,它是静态的,而且相比接下来的做法,它的性能也大大不如。
所以这个代码还行,但是它有些缺点,其中最重要的是它是静态的。
假设我们此时我们现在在contentLayer上了加了一个文字层, 我现在想我点击这个文字增加一个animation动画,在contentlayer上上下活动,然后我想这个倒影层始终保持更新同步(文字也在倒影层中移动)? 这个该怎么做了?
所以这是当前做法的局限性,本质上,它是静态的,而且相比接下来的做法,它的性能也大大不如。
 首先神马是CAReplicatorLayer:
常见创建倒影的方式:
- 创建一个origin layer,然后将图片设置为它的contents
- 重建一个跟origin layer大小一致的reflection layer,将origin layer赋值给reflection layer,并且将其位置定位到origin layer的下面
- 如果可以,你可以设置一个什么半透明效果layer(optional) 让倒影看起来有点朦胧的感觉
- 创建一个origin layer的mask,并且是一个带有gradient渐变效果的层,而且它的高度只有图片高度的一半
- 将reflection layer加入到origin layer的sublayers中
- (void)createReflection {

[self.view setBackgroundColor:[UIColor whiteColor]];
CALayer *contentLayer = [CALayer layer];
UIImage *flag = [UIImage imageNamed:@"chuck-norris.png"];
contentLayer.bounds = CGRectMake(0, 0, flag.size.width, flag.size.height);
contentLayer.contents = (id)flag.CGImage;
contentLayer.position = CGPointMake(self.view.center.x, 10);
contentLayer.anchorPoint = CGPointMake(0.5, 0);
contentLayer.backgroundColor = [UIColor blueColor].CGColor;
contentLayer.cornerRadius = 4.0;

CALayer *reflection = [CALayer layer];
reflection.bounds = contentLayer.bounds;
reflection.position = CGPointMake(contentLayer.bounds.size.width/2, contentLayer.bounds.size.height * 1.5);
reflection.contents = contentLayer.contents;
reflection.transform = CATransform3DMakeRotation(M_PI, 1, 0, 0);

CALayer *blackLayer = [CALayer layer];
blackLayer.backgroundColor = [UIColor blackColor].CGColor;
blackLayer.bounds = reflection.bounds;
blackLayer.position = CGPointMake(blackLayer.bounds.size.width/2, blackLayer.bounds.size.height/2);
blackLayer.opacity = 0.6;
[reflection addSublayer:blackLayer];

CAGradientLayer *mask = [CAGradientLayer layer];
mask.bounds = CGRectMake(0, 0, reflection.bounds.size.width, reflection.bounds.size.height /2 );
mask.position = CGPointMake(mask.bounds.size.width/2, mask.bounds.size.height);
mask.anchorPoint = CGPointMake(0.5, 0);
mask.colors = [NSArray arrayWithObjects:
(id)[UIColor clearColor].CGColor,
(id)[UIColor whiteColor].CGColor, nil
];

reflection.mask = mask;

[contentLayer addSublayer:reflection];

[self.view.layer addSublayer:contentLayer];
}
代码看起来还是蛮直观的, 但是这里有几个重要的基本概念得弄清楚。
第一个坐标系(Geometry):
CALayer *contentLayer = [CALayer layer];
UIImage *flag = [UIImage imageNamed:@"chuck-norris.png"];
contentLayer.bounds = CGRectMake(0, 0, flag.size.width, flag.size.height);
contentLayer.contents = (id)flag.CGImage;
contentLayer.position = CGPointMake(self.view.center.x, 10);
contentLayer.anchorPoint = CGPointMake(0.5, 0);
contentLayer.backgroundColor = [UIColor blueColor].CGColor;
contentLayer.cornerRadius = 4.0;
这一段代码很简单就是将contentLayer定位到屏幕水平中间,竖直方向离顶端10个point的地方,然后设置了它的背景颜色和圆角效果(如果要对image做复杂的圆角处理,参考WWDC 2011 Practical Drawing中Bezier Path Drawing). 但是这里却体现core animation中看似最简单实际比较复杂的部分: Geometry. 它有几个常常出现的关键字: position, bounds, anchorpoint, 基本上它们是结对出现的。
如果你看过apple的developer documentation中关于"Layer Geometry and Transforms“ 以为自己懂了,然后一看到实际代码却晕了的人,可以看看接下来这段解释。 ios的坐标系是这样: x轴往右是正,y轴往下是正。这根一般的坐标系不太一样。
bounds 很简单,它有origin 和size两个部分组成。 由于bounds是针对自己所在的layer,所以它的origin没有啥可以参考的。 所以设置bounds基本上主要目的是设置它的高度和宽度。 而position不一样,它是针对super layer而言的, 这一点跟frame一样。 而AnchorPoint却跟bounds和position又不一样,它是相对于bounds和position的比例而言,所以它是小数的方式表示。如果没有显示指明anchorpoint的值,默认是(0.5,0.5);如果没有显示指明position的值,它的值是(0,0)。
这一段描述还是过于抽象,这样从上面的例子来说吧。我们先设置bounds,那就是contentLayer的长和高。 然后设置它的position,它是在水平的中间和竖直方向的顶部。假图片的长高是200. 那么这里如果不设置anchorPoint的值,那么它默认是(0.5,0,5) ,那么你会看到图片前(200 - 100 - 10 = 90) 90像素超出了整个屏幕。因为它(0.5,0.5)定义了postion将是在bounds横轴宽的中间位置和数轴的中间位置。 如果我们想让图片在10像素时才开始显示,其实也是想让数轴上的position刚刚也是bounds的origin y轴起点,由于y轴往下是正,所以我们就是将anchorpoint设置为(0.5,0) .
那你再看如果设置mask层时,可能就相对容易了。我们先设置它的长高,长度是一样的,但是高度就只有一半了。然后接下来需要注意了:
mask.position = CGPointMake(mask.bounds.size.width/2, mask.bounds.size.height);
你需要注意到position并不是CGPointMake(mask.bounds.size.width/2, 0), 因为我们需要做倒影,所以在
reflection.transform = CATransform3DMakeRotation(M_PI, 1, 0, 0);
调用了CATrasnform3D来对空间做出调整。这里我们绕着x轴,顺时针旋转了180度,所以整个reflection层都倒过来了。但是它是按照哪个点进行旋转了,虽然我们知道它是按照x轴旋转的? 所以这里的anchorpoint就是重要的,它作为任何改变层的geometry的轴心点。我们知道如果我们不指定anchorpoint,它默认是(0.5,0,5)就是在层的正中间。 所以图片才会正确的翻过来。但是因为这种transform赋值是会应用到所有的sublayer 包括自己的。 所以此时reflection包括所以它的子层的坐标系发了改变,y轴已经倒了过来,现在是指向了上面。试想一下,x轴不懂,顺时针转180度,此时是不是y轴就刚好倒了它的反面。所这正是mask的position.y 是mask.bounds.size.height而非0的原因。
所以这个代码还行,但是它有些缺点,其中最重要的是它是静态的。
假设我们此时我们现在在contentLayer上了加了一个文字层, 我现在想我点击这个文字增加一个animation动画,在contentlayer上上下活动,然后我想这个倒影层始终保持更新同步(文字也在倒影层中移动)? 这个该怎么做了?
所以这是当前做法的局限性,本质上,它是静态的,而且相比接下来的做法,它的性能也大大不如。
具有动态更新能力的CARepliatorLayer
如果有看过wwdc 2011中Session 421 Core Animation Essentials,你可能记得作者简要的描述了一下CAReplicatorLayer的原理,但是可能没有太实际的感受。所以私底下,我找了找,找到了一位大牛Brian M. Coyner的Core Animation Fun House ,这种就有一个关于如何使用CAReplicatorLayer作倒影的例子。虽然看起来很简单,但还是涉及到一些关于core animation很基础很重要的概念。有感兴趣的可以checkout他的项目,然后仔细看看.
首先神马是CAReplicatorLayer:
The CAReplicatorLayer class creates a specified number of copies of its sublayers (the source layer), each copy potentially having geometric, temporal and color transformations applied to it.简要的说,它自己能够重建包括自己在内的n个copies,这些copies是原layer中的所有sublayers,并且任何对原layer的sublayers设置的transform是可以积累的(accumulative). 基本上这样的一个关系:我们首先会重建一个CAReplicatorLayer实例,作为我们的sourceLayer, 这个sourceLayer我们需要一份copy,那包括自己在内就是2; 所以我们设置了它的instantCount = 2;这个是包括自己在内总共为2. 然后我们将SourceLayer的宽度设置为image的宽度,但是将其高度设置为image.size.height * 1.5; 并且在sourcelayer上加上masksToBounds为true的属性,这样一来我们可以保证超出的倒影部分会cut调一半,加上sourceLayer上正常的image,刚刚好组成了我们的完整的倒影。我们sourceLayer的sublayer就是_imageLayer,。但是我们只是单纯设置instantCount = 2的话, 那个_imageReplicatorLayer(这个就指代的是copy过来的第一个变量)是会继承sourceLayers中_imagelayer的Geometry,所以它两是重合的。那么我们必须做出transform, CARepliatorLayer有一个属性叫做instantTransform,这个属性指定了除了原来copy之外所有replication layer的trasnform规则,重要的是它是递增的。比如我们这里需要将imageReplicatorLayer应该往下移动image的高度,这一样来可以保证它是刚刚好在原来imagelayer的正下方,就跟倒影一样。 但是不一样的地方是:这个复制的imageReplicatorLayer它不是正常的,它是需要倒过来的,所以我们在transform上使用了 transform = CATransform3DScale(transform, 1.0, -1.0, 1.0); 这一个的意思是大小不变,但是y轴倒过来,这个应用到imageReplicatorLayer的坐标系是y轴朝上。 这样以来你就不能单纯是向原来一样移动image.height了, 因为y轴反了过来,所以你应该是 -2 * image.size.height 这样以来就搞定了。 最后我们给它加了一个渐变层,让它看起来更接近倒影的感觉。
[self.view setBackgroundColor:[UIColor whiteColor]];
[[self view] layer].borderColor = [UIColor blueColor].CGColor;
[[self view] layer].borderWidth = 2;

CAReplicatorLayer *layer = [CAReplicatorLayer layer];
[layer setContentsScale:[[UIScreen mainScreen] scale] ];

[layer setBounds:CGRectMake(0, 0, image.size.width, image.size.height * 1.5)];
layer.masksToBounds =  YES;
layer.anchorPoint = CGPointMake(0.5, 0.0);
layer.position = CGPointMake(self.view.frame.size.width/2, 10.0);
layer.borderColor = [UIColor redColor].CGColor;
layer.borderWidth = 0;

layer.instanceCount = 2;

CATransform3D transform = CATransform3DIdentity;

transform = CATransform3DScale(transform, 1.0, -1.0, 1.0);
transform = CATransform3DTranslate(transform, 0, -[image size].height * 2, 1.0);

layer.instanceTransform = transform;

_imageLayer = [CALayer layer];
[_imageLayer setContentsScale:[[UIScreen mainScreen] scale]];
[_imageLayer setContents:(__bridge id)image.CGImage];
[_imageLayer setBounds:CGRectMake(0.0, 0.0, [image size].width, [image size].height)];
[_imageLayer setAnchorPoint:CGPointMake(0, 0)];

[layer addSublayer:_imageLayer];

CAGradientLayer *gradientLayer = [CAGradientLayer layer];
[gradientLayer setColors:[NSArray arrayWithObjects:(__bridge id)[[UIColor whiteColor] colorWithAlphaComponent:0.25].CGColor, [UIColor whiteColor].CGColor, nil]];

[gradientLayer setBounds:CGRectMake(0, 0, layer.frame.size.width, [image size].height * 0.5 + 1.0)];
[gradientLayer setAnchorPoint:CGPointMake(0.5, 0)];
[gradientLayer setPosition:CGPointMake(self.view.frame.size.width/2, image.size.height + 10.0)];
[gradientLayer setZPosition:1];

[gradientLayer setContentsScale:[[UIScreen mainScreen] scale]];

[[[self view] layer] addSublayer:layer];
[[[self view] layer] addSublayer:gradientLayer];
所以了,如果现在你想在图片层上加一个文字,而且想让文字也出现在倒影中,就是非常简单了。因为所有的replicator layer会监视source layer中sublayers的动作变化,一旦它发生变动,所有的replicator layers会对应的进行重画,而且性能看起来还不错。
//Final step to show it dynamic nature
CATextLayer *textLayer = [CATextLayer layer];
[textLayer setContentsScale:[[UIScreen mainScreen] scale] ];
[textLayer setString:@"Chuck Norris"];
[textLayer setFontSize:18];
[textLayer setAlignmentMode:kCAAlignmentCenter];
[textLayer setShadowColor:[UIColor blackColor].CGColor];
[textLayer setShadowOpacity:1.0];
[textLayer setShadowOffset:CGSizeMake(-4, -4)];
[textLayer setBounds:CGRectMake(0, 0, _imageLayer.frame.size.width, 30)];
[textLayer setPosition:CGPointMake(_imageLayer.frame.size.width/2, _imageLayer.frame.size.height - 20)];
//[textLayer setAnchorPoint:CGPointMake(0.5, 0.5)];
[_imageLayer addSublayer:textLayer];
[self.view setUserInteractionEnabled:YES];
[self.view setMultipleTouchEnabled:YES];
[self.view addGestureRecognizer:[[UITapGestureRecognizer alloc] initWithTarget:self action:@selector(animateTextLayer:)]];

- (void)animateTextLayer:(id)animateTextLayer {
CALayer *textLayer = [[_imageLayer sublayers] objectAtIndex:0];
CABasicAnimation *animation = [CABasicAnimation animationWithKeyPath:@"position.y"];
CGFloat endPoint = [textLayer frame].size.height /2;

//textLayer.position.y
[animation setFromValue:[NSNumber numberWithFloat:textLayer.frame.origin.y + endPoint]];
[animation setToValue:[NSNumber numberWithFloat:endPoint]];
[animation setDuration:3.0];
[animation setRepeatCount:MAXFLOAT];
[animation setAutoreverses:YES];

[textLayer addAnimation:animation forKey:nil];

}
非常酷,而且直观。 事实上CAReplicatorLayer可以做出很多经验的效果。
joericioppo 有一个结合CAReplicatorLayer和CATransform3D起来的demo,甚是强大,就是这3D中各种轴旋转,直接把我转晕了,但是透过它,你可以更好的理解CAReplicatorLayer以及如何更好的使用CAReplicatorLayer: https://github.com/joericioppo/CAReplicatorLayer_Animation